Monday, March 21, 2011

WEEK 14 - PRESENTATION FOR ASSIGNMENT 2 : IMAGE MANIPULATION

Image 1 (BMW Brightness / Contrast / Vibrance / Saturation)

1.    Open the image BMW.
2.    Adjust the brightness to 51 an contrast to 36 by select an image toolbar
3.    Image > Adjustment > Brightness / Contrast.
4.    Set the Vibrance to 84 and saturation as 70.
5.    To choose Vibrance, go to toolbar for Layer > New Adjustment Layer > Vibrance.
6.    To choose Saturation, go to toolbar for Layer > New Adjustment Layer > Saturation.
7.    Save the file .psd
8.    Save the file .jpeg
before
after
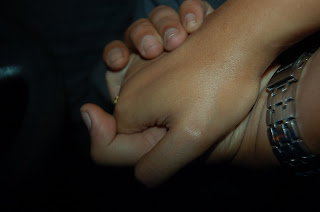
PICTURE 2 (HAND / CROP / ROTATE /BLACK&WHITE)
1.    Choose and open the picture file.
2.    Crop the picture to focus on the hand only and cut-out the dark area.
3.    Over exposed the picture by adjusting the contrast extremely.
4.    Adjust the brightness and contrast by selecting an image toolbar.
5.    Image > Adjustment > Brightness / Contrast.
6.    Change the colour of the picture to black and white by select an image toolbar.
7.    Image > Adjustment > Black & White or Image > Mode > Grayscale.
8.    Texturize the picature by select a Filter toolbar.
9.    Filter > Filter Gallery > Texturize > Texturizer.
10. Save the image.
 before

after
PICTURE 3 (Sheikh Muzaffar / Combine / Resize / Transform / Rotate)
1.    Open a landscape picture as a background.
2.    Open a portrait image of me.
3.    Open a picture of TokJoFamily.
4.    Open a shoe picture.
5.    Create four new layer by select Layer toolbar
6.    Layer > New > layer
7.    Select me on image picture of me by using a quick selection tool.
8.    After all the image has been selected, choose from toolbar Select > Inverse. Now only selected picture of me were active.
9.    Drag a picture of me on the first new layer.
10. Select a picture of Dr.Sheikh Muzaffar Shah on picture of TokJoFamily by using a quick selection tool.
11. After all the image has been selected, choose from toolbar Select > Inverse. Now only selected picture (Dr.Sheikh Muzaffar)  were active.
12. Drag a picture of me on the second new layer.
13. Adjust the Dr.Sheikh Muzaffar to be sit on the shoulder of me.
14. Select as shoe on image picture of shoe by using a quick selection tool.
15. After all the image has been selected, choose from toolbar Select > Inverse. Now only selected picture of shoe were active.
16. Drag a picture of shoe on the third new layer.
17. Adjust and make it looks like it the shoe is wear by Dr. Sheik Muzaffar.
18. Repeat step 14 to 17 to make the shoe as pair.
19. Once everything in place perfectly, adjust the brightness and contrast accordingly.
20. Finally, adjust the brightness and contrast for background to make it as a real picture.
pic 1
pic 2
pic 3

pic 4

picture after the combination
PICTURE 4 (Peace@Tasek Contrast - Photo Filter (oren) – Hue & Saturation)
1.    Open a picture from the folder as a background.
2.    Select a tudung area (which is in chocolate colur) by using a magic wand tool.
3.    After  all the chocolate area has benn selected, select layer from toolbar.
4.    Layer > New Adjustment Layer > Hue/Saturation.
5.    Once the Hue/Saturation toolbox appear, drag the small icon on the hue and saturation and take note on the colour changes of the tudung.
6.    Choose the new of tudung’s colour that we want.
7.    Use a blur tool from toolbox on the left hand side to blur the mix colour of chocolate and the colour that we have choose before.
8.    By using a blur tool, it makes the image is originally in purple colour as below.
9.    Select the photo filter as orange from the toolbar and choose orange colour to make it sunny.
10. Adjust the curves to control the colour and play with the light.
11. Save the picture.
before

after
PICTURE 5 (McD / combine / Edit - Transform – Warp)
1.    Open a portrait image of McD. 
2.    Open a landscape image of ponds.
3.    Select a picture of Mc Donalds signboard on the picture of McD by using a magic wand tool.
4.    After all the image has been selected, choose from toolbar Select > Inverse. Now only selected picture (Mc Donalds signboard) were active.
5.    Drag a picture of McDonalds signboard on the ponds wall. 
6.    Adjust the McD signboard to make it straight by select an Edit toolbar.
7.    Edit >  Transform > Warp
8.    The application allowed us to adjust on each corner and the centre of the image.
9.    Repeat step  to 7 for the second McD signboard.
10. Erase on the below of the signboard to make it looks like the pile was soiled deep in the water.
11. Set the photo filter as orange.
12. Save the picture.
pic 1
Pic 2

PICTURE 6 (Shadow / Pattern / Grid)
Open the image  first

Make a grid (File > new > width & height = 500 pixels).

Select > select all > edit > stroke > width = 1px and tick inside.

Select edit > define pattern > save & close.

Insert new layer, select edit > fill > select pattern that you have created before (grid).

Press ctrl + I (to make it black).

Use crop tool to remove uneven area (you will get 7 x 5 image).

Separate each square to each layer. Use magic wand & select the first square > copy > paste in each layer. Do this to the next 34 layer.

Use shortcut using Actions. Select Window > actions > create new action > name it > click record.

Click on background layer > press ctrl + J (to copy selection into new layer) > press 8 (to make layer opacity = 80%.

Click on grid layer (top layer).

Click stop button.

Click on second square using magic wand tool > click action (created before) . click play button. Repeat this process until the last square.

Make a new layer and fill it with white (the picture will look washout and has a white line).

Click move tool > tick auto-select. Start click at centre square of the image and arrange it (make it overlapped with each other).

Style the layer, on top left corner square > select fx at layer properties > select drop shadow > hold the key on the fist layer and drag fx down to every single layer.

Click on any of the square and press ctrl + J (make it a little bit darker).

Save file.

    Combination of 2 pic

    Book Cover


    Tools :
    Background colour
    Combine
    Transform
    Text
    Text Effect
    Drop Shadow
    Outer Glow
    Typography = Bauhaus 93
    Size = 72
    Text Colour = Black

    Saturday, March 19, 2011

    WK 11 - 1..2..3...ACTION!!!! in Photoshop....

    Photoshop actions are the best — they save time and make us more productive during post-processing. They can be used to speed up repetitive tasks, make quick work of time consuming edits, and give a little creative inspiration.


    1. FIND ACTIONS PALETTE

    Before you can do anything, you need to have the right tools in front of you. Make sure that the actions palette is activated and visible. It typically shows up as a tab on the history palette, but this may vary depending on the workspace.
    If your actions palette is nowhere to be found, we can activate it under the “Window” menu. Once we do this, we should see a palette similar to the one in this photo. If we don’t have any actions defined yet, we’ll probably just see the “Default Actions” set.
    Sets are a way to group actions as we see fit. To create a new set, pull down the palette menu and click “New Set…”. Give your new set a descriptive name. Also note that when we import and export actions, it’s the whole set rather than a single action.


    2. CREATE A NEW ACTION

    OK, we’ve got some sequence of events we want to record and we’re ready to start the action. Before we can begin recording the action, we’ll need to create the action. Pull down the action menu and click on “New Action…”. Give it a name and a keyboard shortcut if we want. Now we have a new empty action that we can record to.


    3. BEGIN RECORDING THE ACTION

    To begin recording the action, simply select our action in the palette and click on the “Record” icon in the lower action menu or select “Start Recording” from the pull-down menu. Once we click this button, every event we perform will be recorded. This includes menu items, adjustments, layer selections, and any of the Photoshop tools.

    There’s no need to hurry through our sequence of events, because the action is not time based. If we’re not doing something to the image, it won’t be recorded. So take time and get it right.


    4. DO OUR STUFF

    Now do whatever it is that we wanted to do. Perform all the tasks, clicks, option settings, and image adjustments that we want included in our action.
    If we mess something up or if we accidentally skip a step — don’t worry. After recording the action we can go back and edit the steps, add steps, and re-record steps.

    • Save (optional)
      Since I’m creating an action that eventually closes the file, it might be a good idea to quickly save the original prior to running the rest of the action. I don’t include this step in my action because of long save times for large files, but I could lose information if I forget to save prior to running the action.
    • Flatten Image
      Since I’ll be resizing the image, I flatten everything to create a single composite layer. This prevents all of my adjustment layers and whatnot from being scaled separately.
    • Image Size
      I prefer to keep my Flickr photos at 800 pixels on the long edge, so I’ll type in “800″ in the appropriate dialog field.
    • Convert to Profile
      I work in Adobe RGB, so I need to convert everything to sRGB for the web.
    • Convert Mode
      I also work in 16-bit mode, and JPEGs don’t support this. So I switch to 8-bit.
    • Save As
      I didn’t like the results from the “Save for Web” option, so I just use a “Save As” now. Here, I specify that the image should be saved in a “Flickr Upload” folder located on my desktop. I don’t rename the image, so it retains its original name. I also save at a quality of 12 since there are no limits on storage space with Flickr.
    • Close
      After I save the image, I have no need for it so I close it out.
    Some of these events are specific to my personal preferences and my computer’s file structure, so if you’re following along with my example you’ll need to adjust a few values.


    5. COMPLETE THE ACTION

    So once we’re done with the sequence, its time to stop the action. Just press the “Stop” button at the bottom of the action palette and Photoshop will stop recording.
    For some actions, this is the end of the road. But many of my actions are set to require input from the user at specific points along the way.


    6. SET OUR TOGGLE DIALOGS

    An action with no stop dialogs will run through the sequence of events without stopping or asking for anything. So if we have a step that requires some human input or uses a setting that must be adjusted for each photo, we must tell the action that this is the case. To do this, simply click on the box next to the step and we’ll see the icon appear.
    When this box is active on a given step in the action, Photoshop will present us with the dialog box pre-filled as specified by the action. We’ll then have a chance to make adjustments to anything in that dialog before moving on. Once hit “OK” for that dialog, the action continues as it normally would.
    I don’t set any stops for the dialogs. I can do this because each time I use it I want to produce the same results. For my other actions such as “LAB Sharpening”, “LAB Saturation”, or “High Pass Sharpen” (as shown in the image above), I set stop points to adjust certain settings that vary between photos.


    7. INSERT ANY MENU ITEMS

    Inserting a menu item (via the pull-down menu) is similar to recording the action, but it forces a dialog that can’t be toggled off. When the action arrives at that menu item, you MUST interact with it to continue. These menu items so have no preset values like the recorded actions do, so we’ll get whatever shows up by default.
    I personally don’t use menu items very often, but they can be useful for certain situations. If we record an action and we find that the presets from the action item are causing more work for us, delete that step and insert a menu item.


    8. TEST AND REFINE

    I usually don’t get my actions right the first time around unless they’re extremely simple. I find that if I run a few different Photoshop files through the action, I usually uncover some mistakes or find the need to insert additional steps to ensure the action runs smoothly. If we find a mistake with one of your steps, just select that step and “Record Again” (via the pull-down menu). Or if we want to re-order some steps, just drag them up or down the list until they land where you want them.
    I’ve also noted a few quirks about running actions, such as error messages that can occur if something is not possible to complete. Or the fact that working with multiple files, renaming layers, and selecting layers are cumbersome tasks with actions because Photoshop is looking for specific file names or layer names each time the action is run.

    WK 10 - NO CLASS

    We hv no class on this week due to Dr.Zaida was on sick leave.. However 4 of us (Nisa, Nazarudin, Rizal & me) missed about the cancellation. Thus only 4 of us came... No wonder la aft 4.05pm nobody came after us.. Huhuhuhuhu...

    WK 09 - Photoshop Beginner (My 1st product ;p)


    WK 08 - INTRODUCTION of PHOTOSHOP...

    Adobe Photoshop is the premier photo editing software tool available. Whether you are working on a webpage, Powerpoint presentation, or a document to be printed, Photoshop can be used to enhance your images. Participants will learn about image file types, cropping images, compositing (putting several images together), ghosting images (for use as webpage backgrounds), using layers, creating masks, applying filters, and formatting text with bevels and other effects.


    WHY USE PHOTOSHOP?
    The internet was originally created by U.S. Department of Defense researchers to exchange textual documents. Once someone discovered how to add graphics to the exchanged document, however, the internet really began to take off.
    As HyperStudio author Roger Wagner has observed, we live in a mediacentric society that increasingly relies upon multimedia in its varied forms to both inform and entertain us. It is natural for people living within this media-saturated culture to want to create some of that media-- and Adobe PhotoShop is the perfect tool for that task.
    With PhotoShop, you can:
    1. Create original artwork
    2. esign graphics for a webpage or website
    3. Make "ghosted" images that can be used as the background for webpages 
    4. Correct flaws and imperfections in a photograph
    5. create a photo collage : a compostition made up of several different photos
    6. Create a deceptively realistic photo that is not real
    7. Alter photographs for political / propaganda purposes
    8. Design smashing layouts for a classroom newspaper, brochure, or flyer
    9. Have a ton of fun being CREATIVE!
    PhotoShop is a program that is so rich, complex, and powerful, people literally spend most of the waking hours of their life using it, and are still always learning new tricks and techniques! Thankfully, however, the learning curve for PhotoShop is not steep, and users can create very appealing products with a short introduction to the concepts and tools of PhotoShop. That is one of the primary goals of this workshop!
    To help spark your own creativity, I have provided documentation of how I created the images used in this online curriculum in the last section, "Graphics Techniques." Every image in this curriculum that is not a "screenshot" is clickable to the provided documentation.


    OBTAIN THE SOFTWARE


    WinMinimum Requirements for Windows


    MacMinimum Requirements for Macintosh
    • Intel® Pentium® processor
    • Microsoft® Windows® 98, Windows Millennium, Windows 2000, or Windows NT® 4.0
    • 64 MB of available RAM
    • 125 MB of available hard-disk space
    • Color monitor with 256-color (8-bit) or greater video card
    • Monitor resolution of 800x600 or greater
    • PowerPC® processor
    • Mac OS software version 8.5, 8.6, or 9.0
    • 64 MB** of available RAM (with virtual memory on)
    • 125 MB of available hard-disk space
    • Color monitor with 256-color (8-bit) or greater video card
    • Monitor resolution of 800x600 or greater
    ** 128 MB of RAM required to run Photoshop and ImageReady concurrently


    WORKING WITH IMAGES
    From the WINDOW menu, make sure LAYERS and NAVIGATOR have checkmarks beside them. These are floating palettes that are in the bottom right and upper right corners of the screen by default.
    These basic techniques will help you view and navigate around within an image in PhotoShop:
    1. Select a Layer
      1. In the Layer palette (lower right corner) click on a layer to selected it.
      2. The layer will be blue when selected: http://www.adobe.com/products/photoshop/overview5.html
    2. Hide / Show a layer
      1. Click on the eye () next to a layer to hide it.
      2. Click on the same box (which will be empty when the image is hidden) to show the layer again.
    3. Use the Navigation Palette to zoom in/out and move around in a zoomed image Navigator
    4. Resize the displayed window
      1. Click on the lower left corner of a PhotoShop window and hold down the mouse
      2. Drag the corner to resize the window
    5. Move contents of a layer with the MOVE tool
      1. Select the layer containing the content you want to move or reposition (hide/show to find it).
      2. Click on the move tool (arrow tool) in the upper left corner of the toolbar (left side of the screen):
      3. Click and drag on the layer to move it as desired.
    Other PhotoShop Palettes can be viewed or hidden from the WINDOW menu at the top of the screen.
    Basic Keyboard Shortcuts can also be helpful:


    WinWindows


    Mac Macintosh
    Ctrl + A Select all
    Ctrl + C Copy
    Ctrl + V Paste
    Ctrl + N Create a new file
    Ctrl + S Save your file
    Command + A Select all
    Command + C Copy
    Command + V Paste
    Command + N Create a new file
    Command + S Save your file